Tag Archives: Photography

Rule of Thirds

When photographers want to improve their photographs, one of the basic concepts they implement is the Rule of Thirds. Why the rule of thirds? And, what is the significance?

The basics of the rule of thirds is that the space of the image is divided in three both horizontally and vertically resulting in what we commonly know as a tic tac toe grid.

Rule of Thirds Grid

History

The rule of thirds was first implemented intentionally in the late 1700s. The concept started far in advance of photography. Instead, artists implemented the rule of thirds in regards to painting and sculpture. As a result of collaboration from artistic minds of the day, the rule of thirds was deemed to be most pleasing to the human eye. While it is not always desired or necessary to capture photographs using the rule of thirds, photographers can significantly improve their photographs using this concept.

Implementing the Rule of Thirds

Many digital cameras allow users to turn on the grid lines showing the rule of thirds. Turning on this grid helps to remind some that this composition technique is important.

Intersecting Lines

To implement the rule of thirds, compose images by placing the most important elements at intersecting lines where the lines meet.

In this image of the large oak tree, note the intersecting lines along the trunk and major branches. Placing the intersecting lines along prominent sections of the tree allows the eye of viewers to focus on important elements.
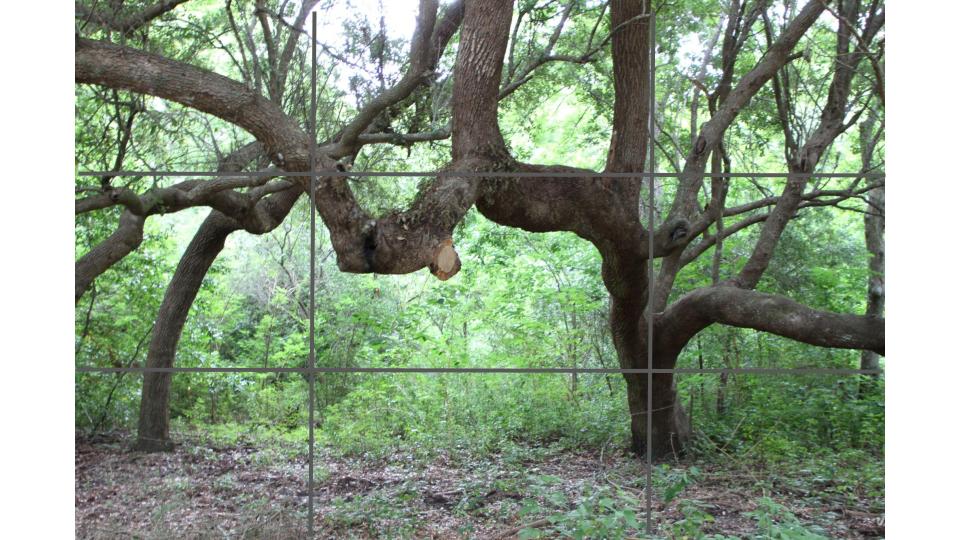
large tree, rule of thirds grid
Large Oak Tree

When to Use the Rule of Thirds

Photographers who want to appeal to the human eye often use the proven concepts rule of thirds. Is this a hard and fact rule to use always. No. There are other techniques to consider as well. However, using the rule of thirds is a tried and true method of improving photographs to have them appeal to the viewer. Use it often.

January 31 – Trifecta Celestial Events

Super Moon / Blue Moon / Blood Moon – Trifecta!

Photographers, sharpen your F-stop and tune up your long lens, as a trifecta of celestial events take place on January 31, 2018. Those of us in North America will have the unique opportunity to experience a rare viewing the Earth’s moon as a blue moon, a super moon, and experience a total lunar eclipse (blood moon).

Blue Moon

A blue moon occurs when there is more than one full moon in a given month. Indeed, the January 31 full moon will be the second full moon in the month of January 2018. And, it will be the only blue moon of 2018.  The last blue moon was May 2016. After this month, the next blue moon will take place in March 2018. While not a rare occasion, a blue moon only happens … well, once in a blue moon. See the list of future blue moon dates.

2018   –   March 1, 2018    /  March 31, 2018
2020   –   October 2, 2020 /  October 31, 2020
2023   –   August 1, 2013   /  August 31, 2023

Super Moon

The orbit of the moon around Earth is not a perfect circle. Instead, it is an elliptical orbit where the moon varies in distance from the Earth during its 27 day orbit. At its perigee, the moon is closest to Earth and appears 14-30% larger than the moon typically appears. Conversely, at its apogee, the moon is furthest from Earth during a given orbital cycle. For a super moon to occur, the moon must be at its perigee and must be a full moon. Though a super moon can occur either during a full moon or new moon. For the purposes of this article, a super moon is a full moon at its perigee._MG_0806 co - signature

While the moon does not occur differently to most people, it is best noticed when the moon is closest to the horizon. Therefore, photographic opportunities of the super moon are best at moon rise or moon set. For those following the super moon, the closest super moon in over 60 years occurred on November 14, 2016.  After January 31, 2017, the next several super moons will take place the following dates.

  • 2019  – January 21
  • 2019  – February 19
  • 2020  – March 9
  • 2020  – April 8

Lunar Eclipse

A total lunar eclipse occurs when the shadow of the Earth completely blocks the light of the sun. Viewing an eclipse was especially heightened during the popularity in the United States as the total solar eclipse of 2017. But, what about a lunar eclipse. For starters, those of us in the United States will be able to view a full lunar eclipse on January 31, 2018.

_MG_8603 stack crThe phenomena of a blood moon occurs during a total lunar eclipse as the moon continues to be visible at lunar totality but has a reddish brown appearance. Without going into an expose about the wave-length of light and light bending (which this author does not intimately follow), the short of it all is that the light remaining during a total solar eclipse is absent of blues and greens. What remains are reds and oranges leaving the appearance of what some call, a blood moon. After January 31, the next lunar eclipse visible from the United States will be as follows:

  • 2019  – January 19

January 31, 2018

Plan your viewing and photographic trip early and plan to catch a rare lunar event on January 31, 2018 as those in the United States experience a super moon, full moon, and lunar eclipse (or blood moon). And most importantly, share photos for the world to see!


Canon 7D Mark II – Review by Ken Rockwell

I am seeking a new camera and want to make an informed decision. The replacement for my previous camera is the Canon 7D Mark II. I found the Ken Rockwell review to be quite thorough and informative.

Canon 7D Mark II Review by Ken Rockwell

The Canon 7D Mark II is the world’s best camera for shooting indoor or night sports. Unless you have installed special lighting at the arena so you can use an older pro camera like the Canon 1D X or Nikon D4S, the new 7D Mk II has a special new flicker-compensating feature that lets you get consistently great photos without the random dark frames caused by most artificial lighting.

Even in daylight, the 7D Mk II is the best camera for less than $6,000 for shooting any kind of action because of its extremely high 10 FPS frame rate. Only a huge $6,500 pro camera goes faster.

D3S_1595-0600

Canon 7D Mark II (by Ken Rockwell)

The 7D Mk II is the world’s fastest APS-C camera and has more processing power than any EOS camera. It’s faster than any of Nikon’s pro DX cameras like the D2HS. For sports, unless you’re a full-time Sports Illustrated shooter with a $6,800 Canon 1D X orNikon D4S, the 7D Mk II just became the new world’s best sports camera, in most artificial light, no camera is better at any price.

The 7D Mark II’s AF sensor array covers most of the frame, unlike full-frame cameras whose AF areas are still all stuck in the middle. Will this lead to pros abandoning the 1D X and Nikon D4S so we can focus all over our frame? It just might! Who said this was a consumer camera? Its shutter is rated for 200,000 shots! … read more

by Ken Rockwell

Once an educator, always an educator. 
Whether teaching students or when in administration in public schools, I always considered myself an educator. I certainly hold the adage, once an educator, always an educator. This is true in several of my current endeavors: real estate and photography. 

I will elaborate on my real estate endeavors in a later post. Today, I want to brag on a couple of my photography students. 

Spring 2016 has been the first semester that I taught photography for the College of the Mainland’s lifelong learning program. And, what a pleasure it has been for me to have been enriched by the wonderful individuals who took my class. 

From week to week, I saw growth not only in their photography, but also their confidence. One student, Pat, said, “Trudy forced me to get out of my comfort zone.” This is certainly the way to grow.

Students from the lifelong learning program are encouraged to submit art to the Texas City Art Festival. Several did just that. Today was the culminating activities with a program preview and awards reception. 

 Awards were given to two of my students. Patricia Givens took third place while Susan Scott Smith took honorable mention. Both had impressive photographs. I am so proud of these ladies and the courage they exuded to be a part of a large community event. Congratulations to both! 


Editing a Dark Photo with PicMonkey for Hobbiest Photographers

Getting Started Using PicMonkey to Edit a Dark Photograph

Editing photographs is a certain fact with digital photography. Once mastered, editing can be just as fun and rewarding as taking photographs. Let’s look at a photograph that may have been lost to poor conditions and or camera settings and use PicMonkey.com to salvage to would be tossed out file.

  1. Navigate to www.picmonkey.com from your browser.
  2. Select EDIT in the menu window. (PicMonkey has many editing tools that are available for free.At some point, you may be interested in using the free 30 day trial upgrade which gives you access to all tools.)pm start
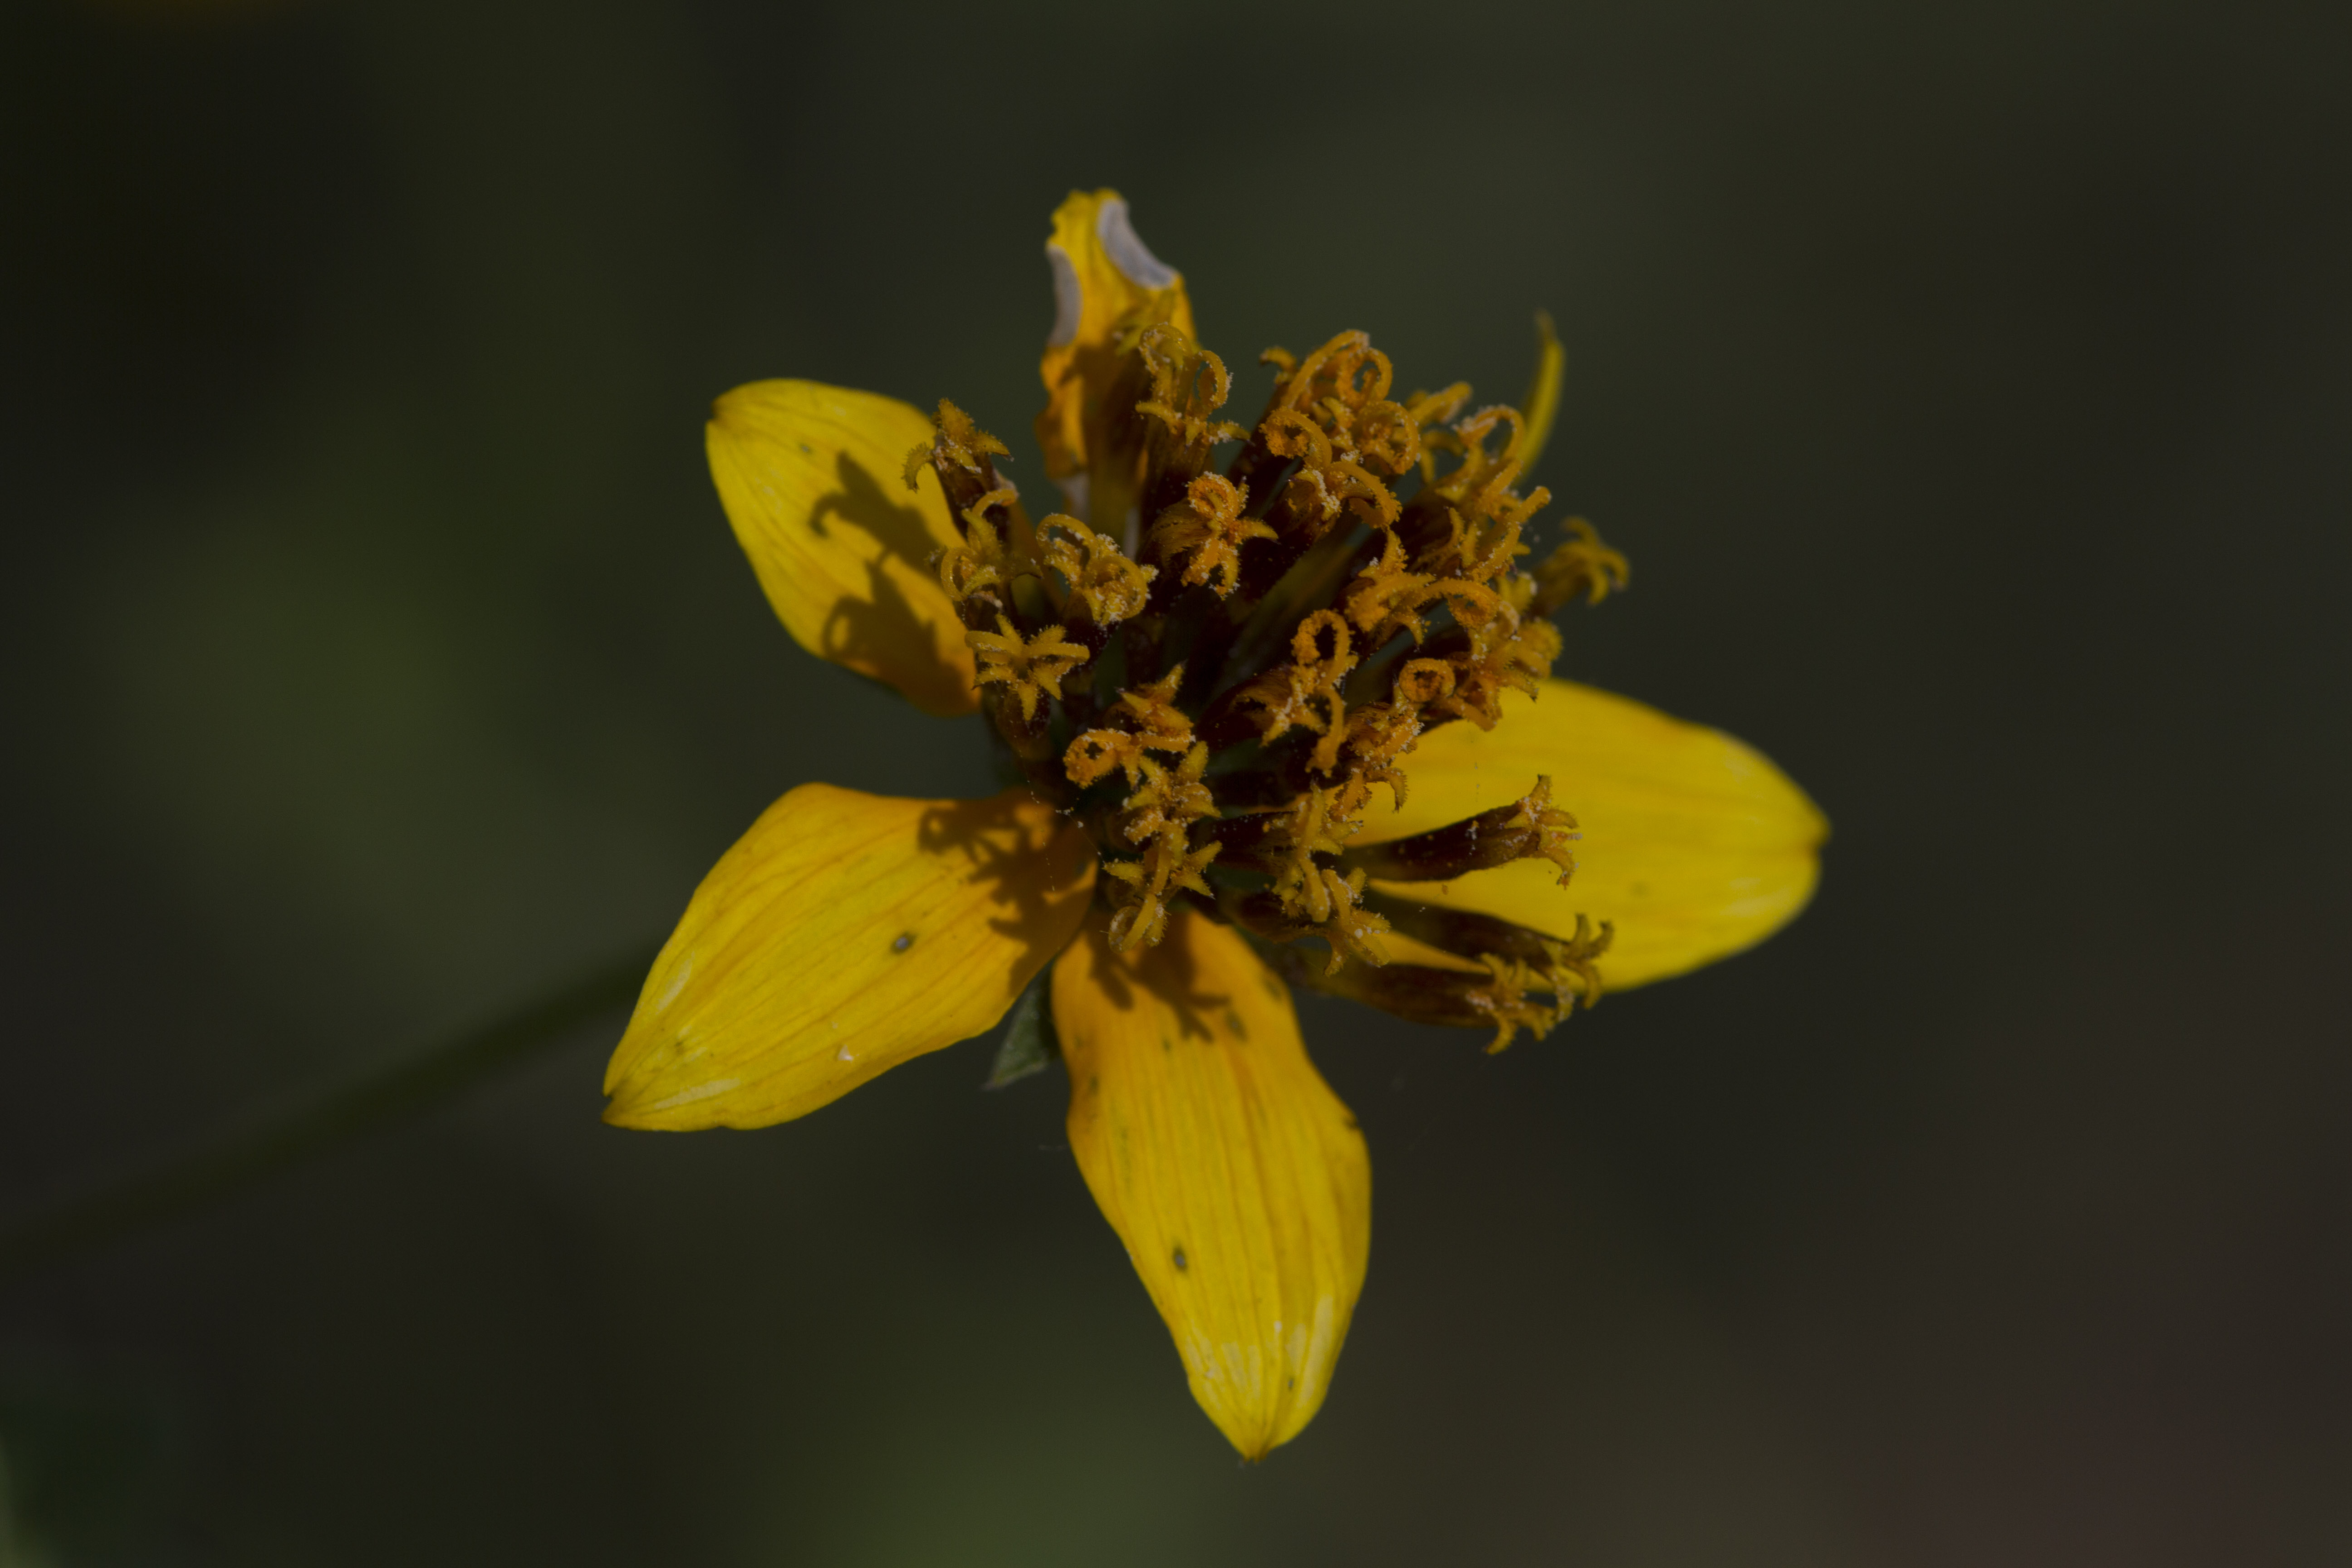
  3. Upload a photograph of your choice. _MG_1881.jpgIn this case, we will be using a photograph of a yellow wildflower that that I took when traversing back roads in Texas. This image is very dark, but I have delayed tossing it to the trash.
  4. When in PicMonkey, you will see several menu options on the left. The first menu option is Basic Edits. In Basic Edits, we will use Exposure, Sharpen, and Crop. 1_Original
  5. First let us start with Exposure. This dark image can most benefit by adjusting the sliders to increase the brightness. Adjust the sliders noticing the changes to the image as adjustments are made. When the exposure is as you like, select Save. At any time you do not like the results of your adjustment, select Cancel to being that setting all over.2_Exposure
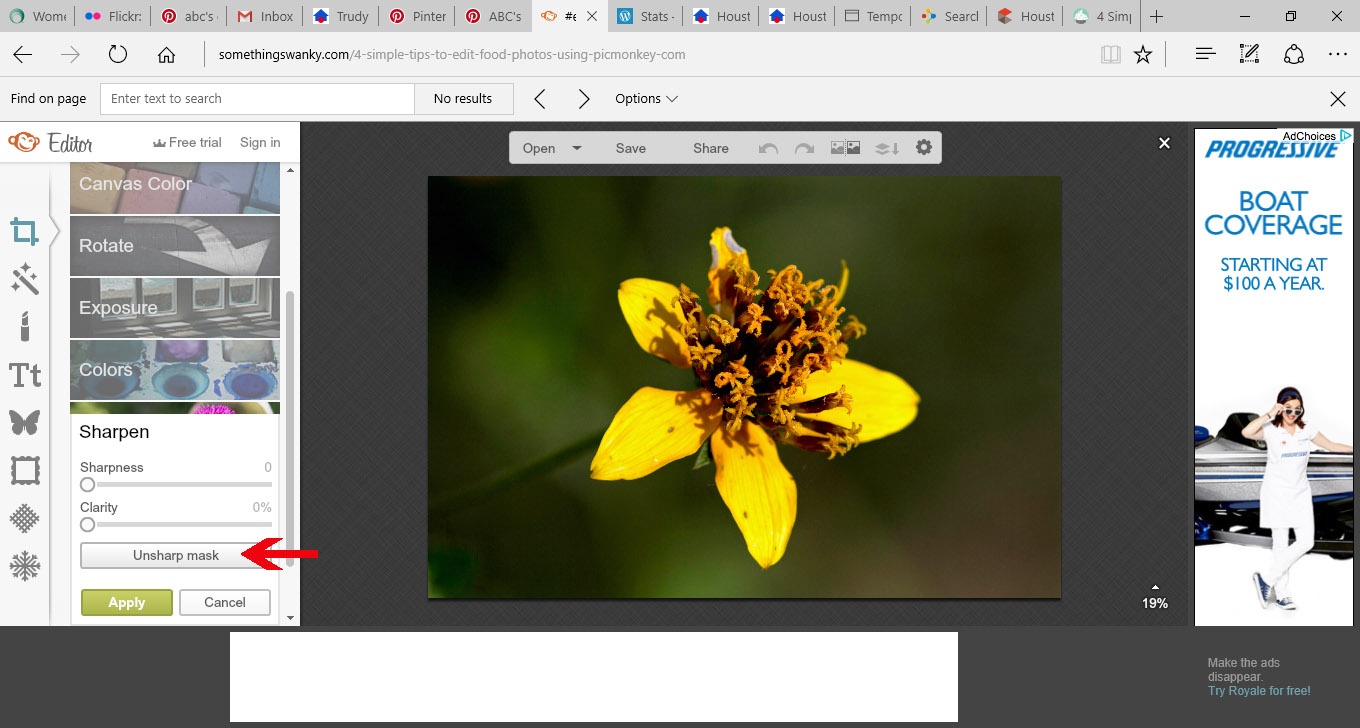
  6. Next we will select Sharpen and then select Unsharp Mask. 3a_Sharpen
  7.   After selecting Unsharp Mask, adjust the sliders to achieve the desired effect.3c_Sharpen
    • Radius means only the pixels next to the edges will be sharpened. It is often effect to select only 1 to 2 for this slider. Otherwise, the results will be a weird halo effect.
    • Threshold determines how much contrast there needs to be between colors for them to be sharpened.
    • Clarity is used to adjust local contrast.
    • Select Save when finished sharpening the image.
  8. Next, we are going to select the Effects menu and scroll down to Camera Effects and select HDR. HDR stands for high-dynamic range and basically pulls out the light, medium, and dark tones in images. In the case of PicMonkey, this filter allows us to use one image. Select Reverse Effect. Apply the HDR filter with a medium to large size brush to the petals of the flower only. Then select Save. 4_HDR_reverse effect
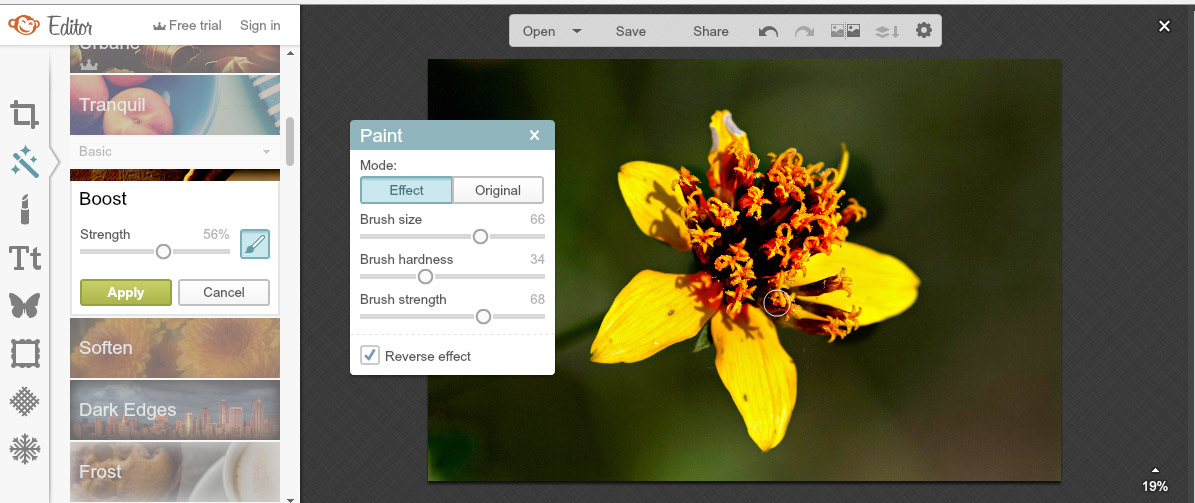
  9. While still in Effects, under Basic, select Boost. Selecting a small brush size and applying Boost only to the anthers of the flower will provide for the desired effect. Always save changes. 5_Boost_pistils
  10. The final adjustment to be made will be to Crop the image ideally placing the flower off center which is more pleasing to view. We will again select the Basic menu and choose Crop. Crop as desired, and Save. 6_Crop
  11. Now to complete our PicMonkey experience, it is necessary to save the image back to your computer. At this point, you can rename the image if desired.
  12. Notice the comparison of the original image and the final edited image. FinalComparison
  13. The final image:
Final

Disclaimer: These adjustments are arbitrary and used on the particular image as indicated and only for demonstration purposes. While this author does not claim to be the expert on PicMonkey, sharing this tool with other hobbyist photographers might allow for alternatives for creative manipulation of images.


Photography – Pasadena, Texas and Surrounding Areas

Photography is my passion! And, it has opened many doors for me. Besides exhibiting and selling some of my works, I have also had the opportunity to share my passion with others.

Today, I did just that as I presented at the Pasadena _MG_2065 coSouth Rotary Club meeting in Pasadena, Texas. The interest shared by the group of about 25 business owners and community members fueled me as I shared stories of a few of the photographs I have taken in their area. As a former Rotarian (soon to rejoin the club), I share the desire to network and provide resources for the community.

I appreciate my friend, Rhonda Parmer of Pasadena ISD, for the opportunity to share with the Rotary Club today!


My Photography Passion

I was asked to teach Continuing Education photography class at a local college. I am very honored to be a part of this program. When I look back on my photography experience, it is easy to remember when I developed a passion for photography.

From the time I was eight years old, I wanted to take pictures. Mostly, I loved seeing the collections of old photographs my grandmothers on both sides of my family had collected. Those old photographs always lead to discussion about family history. I loved those discussions!

After a series of less serious cameras, I bought my Self-Portrait | Flickr - Photo Sharing!Minolta X700. (I still have that camera! More on that topic in a future post.) From that point on, I started learning to see my world differently. In doing so, I wanted to capture my world to reflect on my experiences and to share with anyone who might be interested. So began a lifetime of learning about photography and now about digital photography.

I pray that I am able to live up to the expectations of my students as we grow together and share our common desire to use a camera for whatever purpose.

Tomorrow starts my formal path to teaching photography. I am excited!

Photography Cheat Sheet – By Pixtus

I have long followed the Texas Photo Forum web site as this has been one great resource for photographers in Texas and in particular in the Houston area. A year or so ago, the site changed to Pixtus.com as the owner of the site, Able Longoria, merged his efforts in another state and expanded his site nation wide.

The pleasures I find visiting Pixtus.com in viewing works by others, submitting my own photos for review periodically, and obtaining information about areas of interest.

Recently, Able posted a Photography Cheat Sheet which I believe to be an excellent resource for those of us who want to improve our photography. Check it out!  http://www.pixtus.com/forum/site-info/153508-pixtus-photography-cheat-sheet.html

Trudy’s Flickr Map

States for which I have photos on my Flickr site.

www.flickr.com/tledoux

Age of Canon Lenses

Ever wonder about the age of your Canon DSLR lens? Consider this, the age of the lens and the factory location may denote a particular exquisite quality lens. Or, it may denote a lens with less than perfect features. Knowing how to find the age of your Canon DSLR lens may be beneficial.

Find out more about the age of your Canon lens.